Nesting Pinterest Projects Complete!

Well I’m finally done with all my nesting projects! I can proudly say that I completed “almost” everything on my list, minus two. But I replaced them with even better projects that I came up with. Here are the results, hope you enjoy! (:

IMG_20130314_153238

Bread Bag Chip Clips for Cord Labels. I’ve collected about a handful of these and use neon labels cut to size to label them. I used labels instead of writing on them like the original idea because the sharpie wouldn’t stay on the plastic, it kept smearing off. Also some of the clips had expiration dates printed on them that I could not get off, so the labels covered them right up! Additionally, if I decide to get rid of whatever it is that’s labeled, I can remove the label and replace it with another one instead of throwing the entire thing away! #Recycle

IMG_20130306_011127

DIY Pinterest Inspired Towel Travel Case: This is soooooo much better than those nasty plastic toothbrush covers that don’t give your toothbrush enough air to dry completely and ends up molding and stinking up your toothbrush. Not to mention how dirty they get! This is way more practical for such hygiene products. It’s easy to clean, just throw it in the washer, it holds ALL your tooth cleaning supplies, and it’s too cute! You can decorate it however you want and make as many pockets as you want. You can add things to it like embroidery, extra ribbon, etc. I’m going to make more of these! (:

2013-03-04_23-58-55_816

My DIY Scarf Organizer: This was one of my favorites! It was so cheap and so cute when I was finished. I already had the hanger, just bought shower curtain rings at the dollar tree for $1, turquoise paint @ Walmart for 50 cents, and turquoise ribbon $1.97 each (I bought two spools, used 1 1/2). It looks so cute I don’t even want to hang it in my closet I want to hang it on the wall for display, but that’s tacky, so it’s in my closet, lol! ;D

2013-02-28_14-25-24_831

DIY Clipboard: How cute is this?! I bought the clipboard at the Dollar Tree ($1), Duct Tape @ Walmart ($3.50) and Ribbon also @ Walmart ($0.50 per yard – 1 yd.) It’s so girly and looks great hanging on my wall. Also very useful and the ribbon just adds the girly touch to it that I try to add to everything of mine. ♥

IMG_20130314_201155

DIY Outlet Covers: This project was replaced by these adorable outlet covers. It was supposed to be decorative storage tins but I didn’t have tins or chalk board paint; I do plan to get some in the future. I was going to spend $8.99 each on 2 outlet covers, but the problem was only one of my outlet covers had a place to insert a screw. The other one is screwless, and I couldn’t find zebra printed screwless outlet covers ANYWHERE online! So instead of spending the money and frustration on trying to find something that I had no luck with, I made my own! I didn’t even get the idea from anywhere, it just came to my mind because I’ve been crafting with my zebra duct tape A LOT. Actually, scratch that, the idea came from a picture my mom shared on my Facebook of a light switch plate covered in washi tape, which I thought was the cutest idea ever! So I remixed it to fit my needs. (:

IMG_20130323_110956

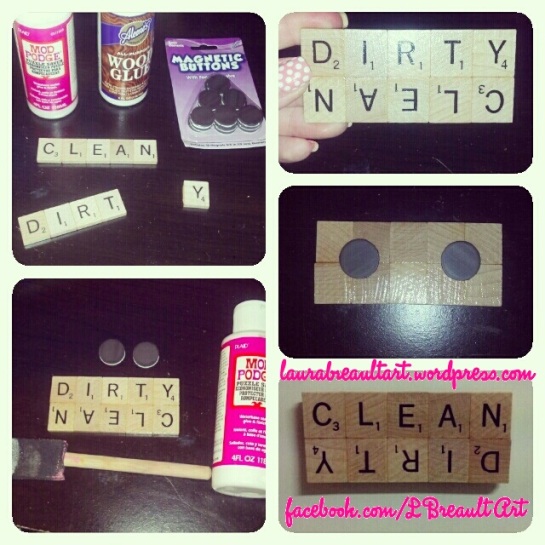
DIY Laundry/Dishwasher Magnet: This project was replaced by this cute little idea I got from Pinterest. It was supposed to be the other storage bins for my daughter’s headbands, but as I’ve mentioned I had no tins and no chalkboard paint. So this is what I made instead! We don’t have a dish washer, but if you do this is the perfect little magnet for it to answer that common question: “Are these dishes clean or dirty?!” I used to have one in my old house, so I know about the question, lol. I made this one to use for the laundry machine. Isn’t it adorable?!

IMG_20130303_174800

DIY Door Muff for Baby Nursery: This was an easy hand sewn project that took about an hour to make. I fell in love with the idea when I saw it on Pinterest and said to myself “I HAVE to make this for Natalia!” So I did, and I made it using colors and prints that would match her room. It’s purpose is to shut the door quietly without making any noises that will wake her. (:

2013-03-17_16-00-58_758 2013-03-17_16-05-55_441

DIY Bib Hanger: This was a clever idea I came across! Just buy adhesive hooks, stick them on the back of your high chair, and there you have it, easy to grab baby bib organization. It would be foolish of me NOT to do this…how convenient for me and what a space saver!

MaternityAshley

My professional photo shoot ribbon pic. I loved the ribbon idea because, well, I’m obsessed with ribbon. Photo credits to my good friend Ashley Rapasky. She does AMAZING photos so check out her fan page and click the like button! (:

IMG_20130314_143417

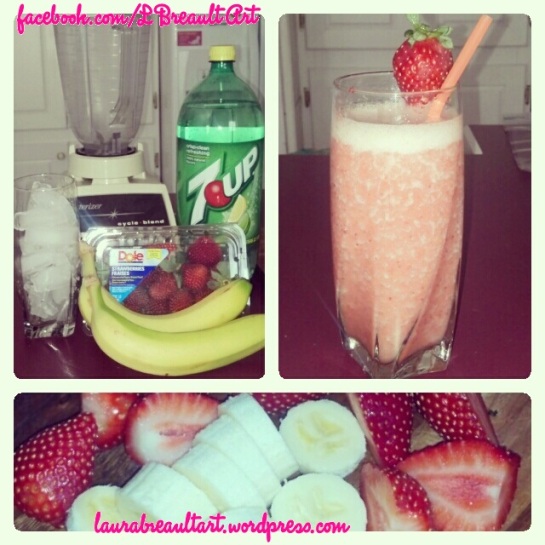
Healthy Carbonated Beverage: This was the last project on my nesting project list, although this isn’t really much of a project, more like a recipe. But nevertheless, it was on the list and it’s checked off as DELICIOUS! Everything you need to make it is shown here. Takes 5 minutes to make and it tastes so good! (:

IMG_20130322_233855

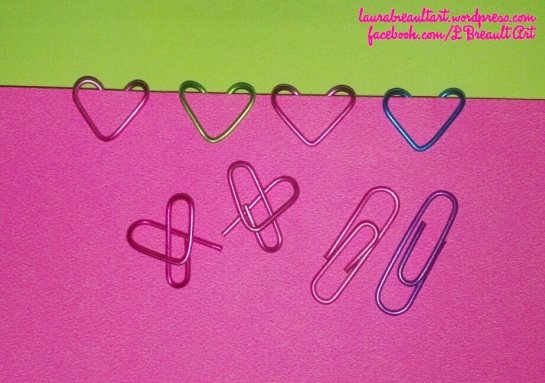
DIY Paper Clip Hearts: & since the last project wasn’t really a project, here is one I did while bored that I also came across on Pinterest. Paper Clip Hearts! Something to do when you’re bored, easy to make, also very personalized and girly. I love them! I made all my paperclips that I could find into hearts. ♥ ♥ ♥

So these are some of the things I’ve been spending my time doing while I wait for Natalia to arrive, which by the way, SHE IS STILL NOT HERE!!!!!! So that means I have to make another list of projects to do until she finally does decide to come. xoxo ♥

Signature_12252012

Pregnancy Post #15 – 34 Weeks

2013-02-05_14-01-09_728

34 Weeks & 1 Day Pregnant

34 Weeks 4 days pregnant today and counting! It is incredibly hard to believe that I am less than 6 weeks away from delivering the most beautiful little girl. I am so ecstatic and cannot wait until my little Natalia gets here. Wow, she’s got her momma so anxious to meet her! Every time, I feel her, think about her, talk about her, or see anything baby and girly, a huge smile forces itself across my face. She makes me so happy and she’s not even here yet. I didn’t know it was possible to love somebody so much. I mean, don’t get me wrong, I love my mother with every inch of heart, but it’s just not the same kind of love that you have for your own child. Now I know how much my mom loves me. (:

Of course, one of my BIGGEST flaws kicked in: my procrastination. I was supposed to be done with painting Natalia’s dresser by now, but a couple of road bumps delayed me. First, I didn’t have everything I thought I needed. Then I realized I bought too much paint, so I had to return it and buy a smaller (more affordable) amount. Then I lost the brushes I bought, so by the time I found those I really didn’t even feel like painting anymore. But then, I finally was able to get everything I needed together: primer, paint, tape, trays, brushes, sandpaper, and shower curtain liners to catch the mess.

2013-02-06_18-40-10_167

As you can see, the dresser is disgusting.

I’ve already taken the dresser apart, sanded it down, primed it, and painted one coat. Tomorrow I’m going to finish it with a second coat and then when it drys, prepare the room for the walls to be painted. Since I don’t have a man around to help, I’m all on my own, which is also why it’s taking me so long to do a less than 24 hour job. But hey? I’m pregnant! So it’s totally fine that I’m taking my sweet time to do this. I don’t feel guilty one little bit. I’m totally capable of moving the things that are in the room around without straining myself or lifting anything heavy. When I get ready to paint the walls I have to move everything to one side of the room, paint half of it, let it dry, and then move everything to the other side so I can paint the other half. This will probably take me an entire week to finish! I also plan on ordering some cute zebra handles and knobs that I saw on Amazon to replace the old ugly, rusted gold ones that I will hate to have to put those back on. Then I will finally start putting her crib and changing table together and organize the room to make it look like the perfect nursery for my princess.

2 outfits for 2 bucks @JCP! :D

2 outfits for 2 bucks @JCP! 😀

I’ve been doing quite a lot of shopping lately, but allllllll baby stuff, so it’s not guilty shopping, it’s productive shopping. That’s my positive way of looking at spending money. I got a bunch of bottles, cloth diapers, clothes, and some hygiene items; plus the paint for her room and dresser. I don’t know a whole lot, but I know one thing is for sure: Natalia will never lack anything. I will always make sure I make provisions to be able to provide for my daughter. She will always have everything she needs and be able to depend on me as a mother until she is old enough to care for herself. I am very fortunate to be able to provide for her on my own. But of course, I’m not completely on my own. Fortunately I have a mother who is very supportive of me and my pregnancy, and we help each other. She’s my best friend. My only hope is that my daughter and I will have the same kind of relationship with each other that my mother and I have. ❤

2013-02-06_22-00-53_304

Primed Dresser.

2013-02-06_22-01-31_677

Dresser drawers in the hallway out of MY way. (:

I don’t see my doctor again until next week. After that I will start having weekly appointments, so there will be a medical update on every post from then on. So far, everything looks, sounds and feels perfect. Well maybe not that last one. At my next appointment, I’m going to have the doctor recommend me a good pediatrician for Natalia. In the last week I was experiencing this somewhat painful pressure in my abdomen. It was right under my right breast in my rib cage it felt like, and sometimes when I would cough it hurt real bad, or when I would breathe in too deeply, I could feel a lot of pressure there. I was getting concerned about it because it wouldn’t let up and considered coming into the doctor’s office without an appointment because it was hurting so bad. But before I freaked out, I researched it online just to see if it might be something completely normal and sure enough: it is. Turns out that the pain I was experiencing had to do with the baby and the growing uterus putting pressure on my rib cage and other ligaments, thus causing this on and off pain. Actually, I read several different articles about this from girls who are pregnant at 18 weeks, 20 weeks, & 25 weeks. So then I thought, well, I’m already 34 weeks and JUST now starting to feel this pain? I must be one of the lucky ones! And after that the pain subsided. Then it went away, and I haven’t felt anything like it ever since. I’m so glad that I think before freaking out and actually take the time to figure out my own problems without running to every which person for an answer or solution.

IMG_20130208_190736

A couple of Natalia’s things I bought this week ❤

If you’re considering buying maternity jeans, I recommend that you save your money unless you buy them used. To me, they were pretty much a waste of my money. I bought a pair of the cutest maternity jeans online at Amazon for $30. Sadly, I won’t be able to wear them past my 8th month. Shoot, I can barely squeeze into those things now! They are very stylish, but when I sit down, the seam connecting the jean part to the fabric part just cuts into my skin and is SOOOOOO uncomfortable. The funny thing is, I had a pair of skinny jeans that were so stretchy around the waist line that they fit perfectly as my maternity jeans! It’s weird that I had them because when I would wear them before I got pregnant, I constantly had to pull them back up on me because the waist was so stretchy that they just would not stay up. But I’m glad I kept them because they ended up serving me a great purpose during my entire pregnancy, and I still plan on wearing them afterwards! ;D

1/2 way

1/2 way

1st coat done!

1st coat done!

As for Natalia, she is growing more and more each day. I feel like there’s a little sumo wrestler inside of me because sometimes she kicks me so hard, I jerk and jump and make noises thinking “somebody’s beating me up in there!” I get a kick out of it. Her soft little kicks have now turned into some hardcore karate chops (it feels like) and I can’t wait for my next appointment when they do the last ultrasound because then I will get to see exactly which of her body parts keeps pushing me on my right side, lol! The most interesting thing about her is how clever she is already to be just in utero. She is very responsive to things outside of the womb. For instance, the other day, my mom’s boyfriend dropped a pan on the floor and the noise was so loud it scared the baby and made her kick me really hard. So she obviously doesn’t like loud noises, thank goodness for that!

As it gets closer and closer to my due date, the reality of transitioning from a young lady to a young mother is becomes more and more real to me, and I couldn’t be happier about it. Lord knows I’m ready to hold this precious baby girl in my arms already! I am going to try my best to remain patient because I don’t want to rush time since it has gone by so fast. I want to enjoy every moment of this pregnancy one day at a time. ❤

2013-02-08_13-04-44_534 Days Pregnant

^ 35 Weeks & 4 Days Pregnant Photos From This Afternoon. (:

Hot Pink Eye Shadow Tutorial

IMG_20130202_114408This is one of my favorite techniques I’ve EVER used! I saw the idea on a photo I found on Pinterest. I had to try it but I wanted to use my favorite color: Pink, because of the outfit I chose to wear for that day. (:

2013-02-01_09-16-30_976

2013-02-01_09-26-43_898

IMG_20130202_113638

First, I primed my eyed before applying this pearly white eye shadow as my base color. I then used an angle brush to apply the hot pink eye shadow (Beauty Supply Store $1!) in the shape of my crease but halfway between my lash line and my crease, leaving room for the white color to show after I put on my top liner. I darkened the line as I faded the color out towards my brow line giving my eye a high definition look. 2013-02-01_10-26-05_551I put an even more sparkly white eye shadow from a Maybeline eye shadow palette carefully over the white just to cover any pink dust that fell, and also to make the white part stand out. I then applied liquid top eye liner drawing the cat line in the same shape as the eye shadow line. Finally, put on eyeliner (on top inside lash line and tear duct line) and mascara and now I’m done. At this point I put on my lipstick of choice and some lip gloss, now I’m ready to go!

2013-01-29_15-56-14_625BTW, I just bought Maybeline’s new color whisper lipstick #60 Petal Rebel (It’s a very pale but bright pink) and I just want people to know that it’s not all that’s cracked up to be. If you are like me and like matte type of lipstick, the kind that the color actually shows, then this is not the lipstick you want. You have to almost cake this lipstick on your lips for you to get the color of the actually stick, so I would not recommend it. It’s good for those of you who don’t like bold lip color. So I will use this on a day when I’m going for a more natural look. (:

IMG_20130202_113905

IMG_20130202_114209

IMG_20130202_114120

2013-02-01_10-23-51_612

2013-02-01_10-23-59_493

A Work In Progress

As I have mentioned in several of my other posts, I’m reading this AMAZING book that teaches you how to manifest your desires. It inspired me to make this “Creation Box” project that it talks about and so I felt like blogging about my progress! I got paid a couple days ago and went out to the store to buy some supplies that I would need to make the box exactly how I imagined it. I want it to be a representation of everything I like, so I bought some animal print fabric, sparkly sheer fabric, hot pink ribbon, loose glitter, decorative bows, acrylic gems, rhinestones, buttons, glue, my favorite sharpie pens to write with, and there’s still a couple more items I want to purchase. As you can tell, I’m a total girly girl and I love all things pink and sparkly! I think I might be spending a little more money than I should on such a simple project, but I am totally okay with it because for one, I can afford it (fortunately with the help of my financial planner) and two, I want to go all out and put all my creativity into this box because I’m THAT excited about it. After a few minutes of brainstorming I created a mental picture of exactly how I want my box to look and wrote it all down in my notepad. I want the entire box to be covered in a plaid, quilt style with a mixture of different animal prints. Then I want to outline the edges with hot pink ribbon, add some rhinestones in the middle of each corner where a new pattern begins, and make a big pretty fabric bow to glue on top. I want to use my font skills to draw “Whatever is contained in this box – IS!” in really pretty letters covered in glitter. Then I want to decorate the inside too, so it looks pretty when I open the box. I want to decorate the underneath of the lid with pretty paper that says “Laura’s Creative Wish Box”. And on the very bottom I want it to say “It never ends”. I want to put this saying on the bottom because it’s “the end” of the box and as I have learned from Abraham’s teachings that I’m reading, it never ends. You never stop desiring new things, that’s how the world expands and that’s how we, as souls, evolve.

All my supplies (:

All my supplies (:

I also had this great idea to get some decorative stones that look sort of like diamonds, preferably pink, to put in my box. I want to do this to add some pizazz and also so I can tape my clippings to a toothpick and stick it in the stones so they stick straight up. I just think it would make the box look better, more organized, personal and creative. The only problem is, I can’t find them anywhere! Lake City, FL. is a very small town so there are not many options of stores for me to find these stones that I want so bad. I looked at every store, every craft section, looked it up all over google-couldn’t find them. I found some on google but they were WAY too expensive, and I’m just not going to pay more than $10 for some rocks…

Fortunately for me, I found them yesterday on Amazon.com (where they have EVERYTHING you can imagine). Not only did they have the EXACT color stones I was looking for, but they had a 2000 count for less than 6 bucks! I was so ecstatic about finally finding the rocks I was so desperately looking everywhere for, and then came to the conclusion that the Law of Attraction really does work! And since I’ve been feeling so good and positive about everything lately, it worked in less than 48 hours for me! I really could not believe how fast it came to me exactly what I wanted. I didn’t think about how I was going to get it or where or when, I just kept thinking to myself “I want these stones so bad. They will make my box PERFECT, just the way I want it. I’m going to find them somewhere. It will make me so happy to buy the very thing that will complete the perfection of my box.” Sure enough, I found the exact ones I was looking for. So I ordered 2 of them for almost $11.00, free shipping! Anddddddd, they will be delivered to my house in a week, which is great because everything else I have been ordering on Amazon has been taking almost a month to be delivered due to the fact that they are being shipped from out of the country. I love that I can make things happen for myself just like that. I’m going to use the same way I attracted these rocks to my life, to attract even bigger things, such as a car, into my experience and see how quick that happens for me. I’m thrilled to have found ways to make my life exactly how I want it to be and I will be applying this in every aspect of it. I think it would be in everybody’s best interest to try this Law of Attraction way of thinking to improve their life. But start with small things, because that will give you the confidence to know that it works and then attract bigger things into your life, like I did with the decorative rocks. I am still in progress of making this box, but as soon as I’m done, there will be plenty of pictures to show you guys how cute it turned out!

The Box Lid, Almost Finished!

The Box Lid, Almost Finished!

Underneath The Lid, Still Working On It!

Underneath The Lid, Still Working On It!

The rest of the box.

The rest of the box.

Putting Fabric on the Box. This is a little tedious because I'm using silk fabric. ($2 on sale!)

Putting Fabric on the Box. This is a little tedious because I’m using silk fabric. ($2 on sale!)