Chocolate Chip & Oatmeal Lactation Cookie Recipe

If you are a new mother (as I was) and are having a difficult time increasing your milk supply like I did, I would strongly recommend this lactation cookie recipe. Not only are they absolutely delicious, but they definitely help boosting milk supply. Based on what I researched, oatmeal (they have to be real not instant! learned the hard way..), flax seed, and brewer’s yeast are the three key ingredients in producing an abundant milk supply. One article that I read even proved this by mentioning one of their family member’s award winning “milkiest cow”. The reason for their win every year was because the owner put oats in their food, which helped them produce more milk. I also read several other articles describing the same ingredients with the same effects, so I have no reason to doubt this recipe. These cookies were so good, my mom and boyfriend even ate them and would not stop! Seriously, they’re not that hard to make and don’t take that much time. I think it’s well worth making a couple of batches of these cookies if you’re going to make them, especially if there are other members in your house. Now, don’t think that just eating these cookies is going to make you start producing milk. You still have to nurse your baby regularly, pump, eat right, all of the things that are essential for breastfeeding moms to keep up their milk supply are still necessary. This is just to help “boost” it if you are having a hard time like I was. It worked wonders for me at the very beginning, but now it doesn’t make much of a difference. I imagine that it probably works different with different women, but it doesn’t hurt to try! Regardless of whether it boosts your supply or not, at least you have a delicious treat to snack on!. (:

IMG_20130509_190045_052  Ingredients:

  • 1 1/2 c. whole wheat flour
  • 1 3/4 c. oats
  • 1 tsp baking soda
  • 1 tsp salt
  • 3/4 c. almond butter or peanut butter
  • 1/2 c. butter, softened
  • 1 c. flax
  • 3 T brewer’s yeast
  • 1/3 c. water
  • 1 tsp cinnamon
  • 1/2 c. sugar
  • 1/2 c. brown sugar
  • 2 tsp vanilla
  • 2 large eggs
  • 2 c. (12oz) chocolate chips
  • 1 c. chopped nuts of your choice

IMG_20130509_193101_596Directions:

  1. Preheat oven to 350 degrees Fahrenheit
  2. Combine flour, baking soda, cinnamon and salt in a bowl.
  3. In a large bowl, beat almond butter, butter, sugar, brown sugar, vanilla, brewer’s yeast, flax and water until creamy.
  4. Mix in eggs.
  5. Gradually beat in flour mixture.
  6. Mix in nuts and chocolate chips.
  7. Add oats slowly, mixing along the way.
  8. Place balls of dough onto greased baking sheets or baking stones.
  9. Press down each ball lightly with a fork.
  10. Bake 12 minutes.

IMG_20130509_194155_181


Baked or Fried Mozzarella Sticks

One of my favorite appetizers in the entire world, besides stuffed mushrooms, would have to be mozzarella cheese sticks. I absolutely LOVE anything with cheese. In fact, the more cheese, the better. I found a recipe a little while ago on Pinterest that had simple directions on how to make them. The recipe DID NOT WORK so please don’t try it. But just so you know which recipe it was, it pretty much said cut cheese sticks in half, dip them in milk and then in the bread crumbs and then bake them for 15 minutes. All that did for me was give me a baking sheet covered in melted cheese mixed with breadcrumbs. It was a huge disaster and a big mess to clean, not to mention the fact that I couldn’t even eat the stuff! It was such a waste. Well this time, I found a better recipe using an ingredient that made a little more sense for me to use, egg roll wraps. They turned out DELICIOUS. Even though they weren’t breaded, it was still a tasteful replacement. Here’s the recipe:

IMG_20130518_194102_390 IMG_20130518_194615_935 IMG_20130518_195249_494 IMG_20130518_195332_975 IMG_20130518_200055_462 IMG_20130518_200411_969 IMG_20130518_201745_229Ingredients:

  • 12 Wonton or Egg-Roll Wraps, at room temperature
  • 12 Mozzarella String Cheese
  • Marinara Sauce for Dipping
  • Small bowl with water, optional

Baked Directions:

  1. Preheat oven to 400 degrees.
  2. Take one of your room-temperature wraps (less likely to break and ooze cheese all over if room-temp and slightly wet) and lay on flat surface in front of you, like a diamond.  Put cheese stick in middle, corner to corner (or slightly below).
  3. Take the bottom corner and fold it up over the cheese stick and stick to other side of wrap tightly.  You can add a few drops of the water here to make the wrap stick better.
  4. Carefully (here is the part where the wrap can break), fold over the right and left corners of the wrap onto the cheese stick to completely cover the cheese.
  5. Roll up the wrap.
  6. Bake at 400 for 10-12 minutes, turning once, until golden brown.

“Fried” Directions:
Alternatively, you can make this on the stovetop.

  1. Wrap cheese as described above.
  2. Heat 1 Tbsp. extra-virgin olive oil in a skillet over medium-low heat.
  3. Working in batches, add in half of the cheese sticks.  Roll/stir sticks around for about 2-3 minutes, or until golden brown, and remove from heat.

Serve with Marinara (seasoned with oregano/basil/garlic for more flavor) and Enjoy!

This recipe was borrowed from a fellow blogger who’s link is in the opening paragraph. I didn’t bake my cheese sticks, I fried them because I felt that frying them would cook the wrap on the inside better than if I would bake them.

Homemade Churros

Per a request from a favorite facebook friend, I would like to share this homemade churro recipe. I actually copied it from a fellow blogger, but unfortunately I can’t find the link to her blog. But here’s my version based on what i can remember since i made these weeks ago.

2013-04-20_22-34-56_506Ingredients

  • Loaf of white bread
  • Rolling pin
  • 8 oz. Cream cheese
  • 1 cup confectioner sugar
  • 1 cup melted butter
  • 1/2 cup sugar
  • 1 tsp. cinnamon

Directions

  1. Whip a thick icing using the cream cheese and confectioner sugar.
  2. Using the rolling pin, flatten all the pieces of bread excluding the ends.
  3. Spread the desired amount of cream cheese on the entire pieces of bread.
  4. Roll the bread up like a burrito.
  5. Mix the sugar and cinnamon in a bowl evenly.
  6. Dip the rolled churros in the butter and then roll them in the sugar.
  7. Bake on nonstick baking sheet at 350°F for 10-15 minutes or until golden brown.

Homemade Crunchwrap Supreme Remixed

IMG_20130520_191047_713 IMG_20130520_192616_192 IMG_20130520_194415_804 IMG_20130520_194750_361 IMG_20130520_195028_480 IMG_20130520_194406_707 IMG_20130520_201811_002 IMG_20130520_201908_007As tasteful as fast food can be at times, I really REALLY dislike it for several reasons of which I don’t have too much time time to explain. But every now and then I do crave something, fast, fattening and cheap! I’m a huge fan of Mexican food so my first pick is always Taco Bell. They have a delicious menu item called the crunchwrap supreme and it is literally heaven in your mouth-seriously, it’s that good. Well I always prefer to learn how to make my own dishes from scratch so that I know what is actually being put into my food and make sure nothing is dropped on the floor and then put back on my sandwich/taco (I have witnessed this when I worked at Wendy’s, by a manager at that!). Anyways, I found the perfect recipe to make an exact replica of the delicious meal! I even added my own favorable ingredient to make it even more uniquely delicious. Here’s the recipe for you to try:
Ingredients:

  • Large Flour Tortillas burrito style
  • 1 lb ground beef
  • 1 packet taco seasoning
  • sour cream
  • guacamole (optional)
  • shredded cheese or nacho cheese
  • tortilla chips (you could use use a corn tortilla)
  • tomatoes
  • lettuce
  • corn (optional)

Directions:

  1. Brown ground beef in a skillet, add the packet of taco seasoning and stir until mixed well. Cook for another minute or so. For those of you who would like to add corn, boil the corn for ten minutes, let cool, cut kernels off cob with knife, separate kernels using a fork and mix with your ground beef.
  2. Microwave the tortillas for a few seconds just to warm them up, it will make the wrapping easier.
  3. Take a tortilla, spread some sour cream in the center.Top with ground beef.
  4. Top with shredded cheese or a few scoops of nacho cheese.
  5. Next add a layer of tortilla chips or at this point you would add a small corn tortilla like a tostada size.
  6. Top with lettuce and tomato and then starting on the bottom, fold up the tortilla toward the center, continue all the way around until it is all folded over, it WON’T cover it completely.
  7. Carefully lift it up and set it fold side down on a non stick pan. Press with a spatula and cook until nice and brown, flip it over and cook the other side. It won’t take long at all.
  8. Serve with extra sour cream and guac if you rock! ;D

Related Articles: http://fullbelliesmakehappykids.wordpress.com/2011/11/28/homemade-crunchwrap-supreme/

Homemade Frappuccino & Pigs In A Blanket

Looking for a quick snack that’s both delicious and quick to make? Here’s the perfect recipe for you! These pigs in a blanket are AMAZING and they go well with my homemade caramel frapp that I chose to accompany this delicious snack.

2013-04-15_19-00-43_904Pigs In A Blanket Recipe
Ingredients:

  • 1 Package of Little Smokies (You can also use cut up hotdogs to improvise!)
  • 1 Can of Crescent Rolls
  • Parmesan Cheese (Optional)
  • 1 tbsp. Butter
  • 1 tbsp. Flour
  • Large Baking Pan

Directions:

  1. Preheat oven to 350F.
  2. Boil Little Smokies & drain to cool.
  3. Grease Baking Pan with butter and Flour, Any flour left over put back in container or empty in the sink.
  4. Cut the crescent roll dough into little strips, as many as the number of little smokies you have.
  5. Wrap the smokies with the strips of dough and line them on your baking pan. You can sprinkle Parmesan cheese on top for extra flavor if you like.
  6. Bake for 12-15 minutes or until golden brown. Serve Warm

IMG_20130415_191004Caramel Frappe Recipe
Ingredients:

  • 6 oz Cold Coffee
  • 1 cup Milk
  • 2-3 tbsp Caramel
  • 2-3 tbsp Sugar
  • 1 cup Ice
  • Whip Cream to Top (Optional)

Directions:

  1. Blend all Ingredients except the whip cream in a blender until its to your desired consistency.
  2. Pour in a glass and your ready to go! Add whip cream and drizzled caramel on top if desired. (:

Simple huh?! Easy to make and very, VERY tasty. Enjoy! ❤

15 More Nesting Projects To Do

Hello my beautiful readers! As I’ve mentioned in one of my previous posts, I just recently finished completing a list of 10-12 nesting projects that I was inspired to make from Pinterest, and I’m sure you guys are expecting my next list that I talked about making. Well, I’m done choosing which projects to do next while I wait for little Natalia to be here (which btw I’m 41 weeks and 1 day today and she’s still not here!) So to keep my head on straight, I’m going to occupy myself with these cute projects that I found to keep myself busy. (:

#1. Glitter Wine Glasses

155303887120076180_F3gIlXA5_c

After I have this baby, I’m definitely planning on celebrating my treating myself to a very long missed glass of wine, but I want it to be festive and decorative so I’m going to make a pink glitter wine glass for my 9 month break celebration. These are so easy to make, all I need to do is get some very fine loose pink glitter and a couple of cheap wine glasses from the dollar store.

#2. DIY Nail Polish Rack.

ec802992a52689fed2123cf15860e096 dsc05671 07ab90ec8af04c8e1eb6c67f44c3827b

If you follow my blog, then you are familiar with my addiction for nail polish and nail art. I have quite a large collection of nail polish and nail art supplies, but they’re all stored away in shoe boxes. I was going to decorate the shoe boxes but it just seems like to much trouble, especially since they’re not even visible, they’re sitting on shelves in my closet. I planned to buy a nail polish display rack that mounts on the wall from Amazon, but it’s $30! I came across this AMAZING idea where you make your own nail polish rack using foam boards, glue and whatever you want to decorate it with. I find so many pros to this project that completely knock this item off my Amazon wish list. For one, it’s totally affordable. Considering I have all the decorations I need, I only have to spend $12 making this ($7 for 3 foam boards – 1.99 each plus tax @ Walmart, and $4 plus tax for some permanent craft glue.) Aside from the inexpensiveness of this project, one of my other favorite things about it is that you can make it as big or small as you want, add as many shelves as you want, and decorate it to match whatever you want! Instead of using duct tape like many other people used, I’m going to mod podge glitter on mine and use duct tape for the inside background to hide that screws that I will have to insert to mount it on the wall. I also plan to add a larger top shelf to hold all my nail art supplies; which brings me to the next project shown, the decorative tin cans that will hold all my brushes. When I’m done with this project it’s going to look so cute in my room and help me to keep all my nail polish stuff organized. Not to mention the easy access of it being conveniently hung on my wall so I don’t have to take down boxes from shelves!

#3. Modular Shelf Organization.

a1898bd862386d232fc2a3514638820d

This is another item that I have saved to my Amazon wish list. My obsession goes on to make-up which I have TONS of and am looking for new ways to organize it. I’m going to start by moving all my hair care products to modular shelves that I will hang next to my mirror on my dresser, moving them off my dresser so that I have more room to store the new makeup that I keep buying but don’t need.

#4. Glitter Keys

glueglitterclearnailpolish

I LOVE glitter (if you can’t tell) and am trying to use all of mine in the most useful ways. I want to make my ugly keys cute and girly and what better way to do that then to add glitter?! So I’m going to mod podge glitter to all my undecorated plain silver keys to make them look as cute as this one. I want to do them all in pink, but different shades to give them a gradient effect.

#5. DIY Sunglasses Holder

86c78c4179461466caf85a1fd1964386

I have soooooo many pairs of sunglasses put away in a bag that I have to go through every time I want to wear a different pair. It’s a little aggravating to have to dump the entire bag out just so I can see what the pairs look like. Not only that but they are also at risk of being damaged. So I came across this nifty idea that I want to make that also hangs on the wall. (I’m trying to decorate my plain walls!) All I need is a long skinny picture frame and some pretty ribbon (zebra of course!) to make this, so I plan on buying these items sometime this week when I get paid. (:

#6. Glitter Clothespin Magnets

2dfd40d86e0d698477ed4220f1f8cdfb gflitterclothespinmagnets

More glitter? Yes please! I found these ADORABLE clothespin magnets that you can decorate however you want. I like the way whoever did this decorated theirs. They used glitter and zebra print, which is what I plan to do, but I’m going to make mine turquoise, hot pink & lime green. I already have clothespins, magnets and zebra fabric and duct tape, whichever I decide to use. I just have to buy neon acrylic paint that I can get at Walmart for $1.50 a bottle and some new paintbrushes because I’ve been using the heck out of mine! So I’m due for a new set. (: These will go perfect on the DIY magnetic board that I also plan on making, but I will post about that later on.

#7. Shower Curtain Rod Organization

showerrodoppositeformorestorage

Since my shower caddy keeps falling off, and it’s hard to clean, and it’s pretty much breaking my shower head off, I found this useful idea to hang another shower curtain rod on the opposite side of the shower and use curtain hooks to hang dollar store baskets and other items. I’m definitely going to make use of this. I already have the shower curtain rod, but I can get the hooks for $1 at Dollar Tree and the cute baskets (orange to match my bathroom) at Familiar Dollar. I think I can get a pack of 6 for $3.

#8. Bobby Pin Carrier

F99B30F2AEAE2C52ACF5B5835FCC14_h400_w261_m2_bblack_q100_p100_cFuQsHCkx 820b81e68d55e11a14ab3960f6a2e88a

This simple idea is so useful for a girl like me. I use bobby pins ALL THE TIME and need them at the most random times. What better way to carry them than with a tic tac box?! I can use it for traveling and to just have in my purse. All I need to buy are the tic tacs. (:

#9: Easy To Make Bookmarks

d980cd466331df42af9766f7b87b7903 whenyouloseanearring

I’ve never been much of a reader, until lately. And I don’t have any cute bookmarks, but I do have a lot of cute missing or broken jewelry pieces, and tonsssss of scrap-booking paper and supplies as well as ribbon. So I figured I could put these items to use and make my own bookmarks like these cute ones!

#10. Easy To Make Hair Bows

7d2150a33d65c9466bee45d7b74c19b9

I loveee hair accessories: hair bows, headbands, ribbons, clips, flowers, anything to accentuate your everyday hairstyles. So I want to try to make my own just for the heck of it! I found this cute easy tutorial that I want to try out.

#11. Mod Podge Ceiling Fan

76a2987f58948d3712d43bf5b8b78f6a

I have an $80 zebra print fan blade set saved to my “future” Amazon wish list. But that just got deleted the other day when I came across this picture! Somebody used wallpaper border and applied it to their ceiling fan blades that made it look so good I had to do the same! But instead of using wallpaper border (because it’s pretty expensive) I’m going to use fabric mod podge and just apply zebra print fabric to it! I want to do this for my fan and the Natalia’s fan to match her and my zebra print bedrooms. ❤ *BTW the last of these projects including this one are all baby related projects.

#12. Glitter Rocks for Decoration

e8de5332f199f98d2a980b3e5c9b20b8

Yes, I have more glitter projects on the list. A girly girl like me can never have too much sparkle in her life. I think this is the cutest idea ever. Since I live in the country surrounded by woods and nature, these rocks are easy to find around here and match the environment so well, and adding sparkle will just give it that girly personalization that I love to add to everything of mine. But this project however is for my daughters bed room. I don’t have too many things decorating the tops of her dressers and night table, so this is an expensive decoration that I will make for her instead! I just need the rocks, the glue, the glitter and a cute little acrylic container to put them in, which I can get one at the Dollar Tree for just a dollar.

#13. Make a Plain Plastic Basket Cute with Ribbon

2809456d19e9f4640b691be445d1dfd8

Natalia has some baskets in her room that I bought to hold stuff in and they looks similar to this basket but they’re actually cuter because I bought pink ones, hehehe. (; I also have very pretty sparkly silver, black and white ribbon I can use to decorate them with even more because Lord knows how much I love ribbon and how many ribbon bows I already have all over Natalia’s room. She’s going to be such a girly girl just like her momma. ❤

#14. 3D Butterfly Frame

359c4f03ed6849681724982b9d30786c

I think this is just absolutely adorable. All white butterflies and one pink one with the baby’s name date and time of birth. I want to make this for Natalia and hang it on the wall. I need to buy a black frame and a butterfly punch. I have the card stock. This will be so fun to make!

#15. Decorated Letter

8ed9911b504435d938a008ce1360540b 6a9f4b3ba48c6e0b3ec924f26e130b91 6dbd1acd4bee1003bfb97fb8ef58ebdc fabriconcanvaswithwoodletters 505ac2cc508e92751255eac2847351fc 27b47d433e7ecb1b6a5229627b0f37d8

I was going to buy letters to spell out NATALIA, but they are so expensive these days! You can buy cheap ones, but they’re just not as cute as the other ones. I have old letters that spell out KAREN because that’s my sisters name, but she never used them, so they’ve just been laying around collecting dust. I’m going to use just the N letter and decorate that to hang on the door since her room already has too many wall decorations. I have all these photos for ideas and inspiration. ❤

Well these are my project plans for the next few weeks. I’m very excited about making them and I still have more that I want to do! But these will do for now. I will start shopping for my supplies tomorrow, so keep looking for my next post; it will be all these projects but MINE. (:

Signature_12252012

Nesting Pinterest Projects Complete!

Well I’m finally done with all my nesting projects! I can proudly say that I completed “almost” everything on my list, minus two. But I replaced them with even better projects that I came up with. Here are the results, hope you enjoy! (:

IMG_20130314_153238

Bread Bag Chip Clips for Cord Labels. I’ve collected about a handful of these and use neon labels cut to size to label them. I used labels instead of writing on them like the original idea because the sharpie wouldn’t stay on the plastic, it kept smearing off. Also some of the clips had expiration dates printed on them that I could not get off, so the labels covered them right up! Additionally, if I decide to get rid of whatever it is that’s labeled, I can remove the label and replace it with another one instead of throwing the entire thing away! #Recycle

IMG_20130306_011127

DIY Pinterest Inspired Towel Travel Case: This is soooooo much better than those nasty plastic toothbrush covers that don’t give your toothbrush enough air to dry completely and ends up molding and stinking up your toothbrush. Not to mention how dirty they get! This is way more practical for such hygiene products. It’s easy to clean, just throw it in the washer, it holds ALL your tooth cleaning supplies, and it’s too cute! You can decorate it however you want and make as many pockets as you want. You can add things to it like embroidery, extra ribbon, etc. I’m going to make more of these! (:

2013-03-04_23-58-55_816

My DIY Scarf Organizer: This was one of my favorites! It was so cheap and so cute when I was finished. I already had the hanger, just bought shower curtain rings at the dollar tree for $1, turquoise paint @ Walmart for 50 cents, and turquoise ribbon $1.97 each (I bought two spools, used 1 1/2). It looks so cute I don’t even want to hang it in my closet I want to hang it on the wall for display, but that’s tacky, so it’s in my closet, lol! ;D

2013-02-28_14-25-24_831

DIY Clipboard: How cute is this?! I bought the clipboard at the Dollar Tree ($1), Duct Tape @ Walmart ($3.50) and Ribbon also @ Walmart ($0.50 per yard – 1 yd.) It’s so girly and looks great hanging on my wall. Also very useful and the ribbon just adds the girly touch to it that I try to add to everything of mine. ♥

IMG_20130314_201155

DIY Outlet Covers: This project was replaced by these adorable outlet covers. It was supposed to be decorative storage tins but I didn’t have tins or chalk board paint; I do plan to get some in the future. I was going to spend $8.99 each on 2 outlet covers, but the problem was only one of my outlet covers had a place to insert a screw. The other one is screwless, and I couldn’t find zebra printed screwless outlet covers ANYWHERE online! So instead of spending the money and frustration on trying to find something that I had no luck with, I made my own! I didn’t even get the idea from anywhere, it just came to my mind because I’ve been crafting with my zebra duct tape A LOT. Actually, scratch that, the idea came from a picture my mom shared on my Facebook of a light switch plate covered in washi tape, which I thought was the cutest idea ever! So I remixed it to fit my needs. (:

IMG_20130323_110956

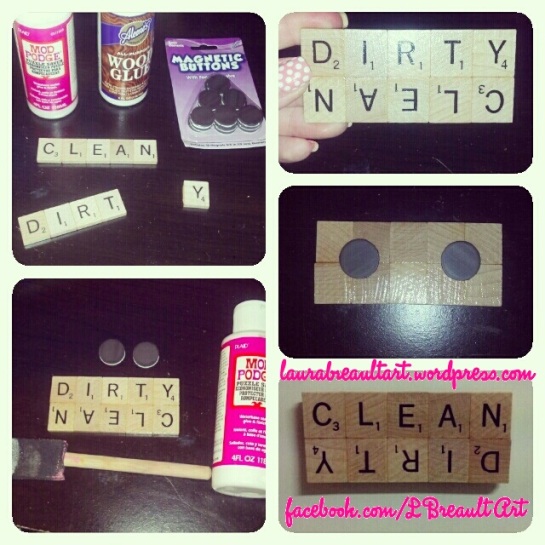
DIY Laundry/Dishwasher Magnet: This project was replaced by this cute little idea I got from Pinterest. It was supposed to be the other storage bins for my daughter’s headbands, but as I’ve mentioned I had no tins and no chalkboard paint. So this is what I made instead! We don’t have a dish washer, but if you do this is the perfect little magnet for it to answer that common question: “Are these dishes clean or dirty?!” I used to have one in my old house, so I know about the question, lol. I made this one to use for the laundry machine. Isn’t it adorable?!

IMG_20130303_174800

DIY Door Muff for Baby Nursery: This was an easy hand sewn project that took about an hour to make. I fell in love with the idea when I saw it on Pinterest and said to myself “I HAVE to make this for Natalia!” So I did, and I made it using colors and prints that would match her room. It’s purpose is to shut the door quietly without making any noises that will wake her. (:

2013-03-17_16-00-58_758 2013-03-17_16-05-55_441

DIY Bib Hanger: This was a clever idea I came across! Just buy adhesive hooks, stick them on the back of your high chair, and there you have it, easy to grab baby bib organization. It would be foolish of me NOT to do this…how convenient for me and what a space saver!

MaternityAshley

My professional photo shoot ribbon pic. I loved the ribbon idea because, well, I’m obsessed with ribbon. Photo credits to my good friend Ashley Rapasky. She does AMAZING photos so check out her fan page and click the like button! (:

IMG_20130314_143417

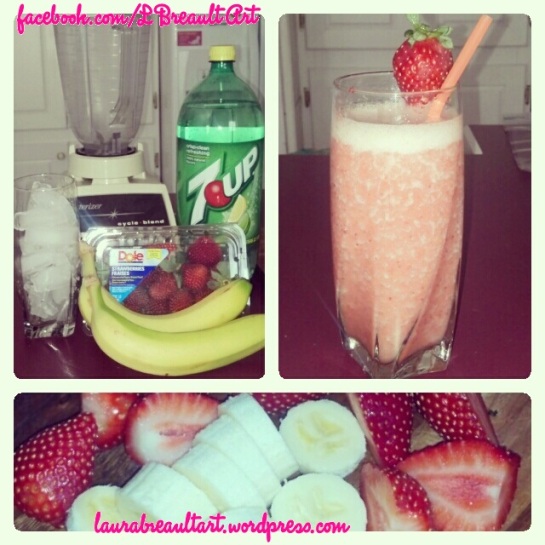
Healthy Carbonated Beverage: This was the last project on my nesting project list, although this isn’t really much of a project, more like a recipe. But nevertheless, it was on the list and it’s checked off as DELICIOUS! Everything you need to make it is shown here. Takes 5 minutes to make and it tastes so good! (:

IMG_20130322_233855

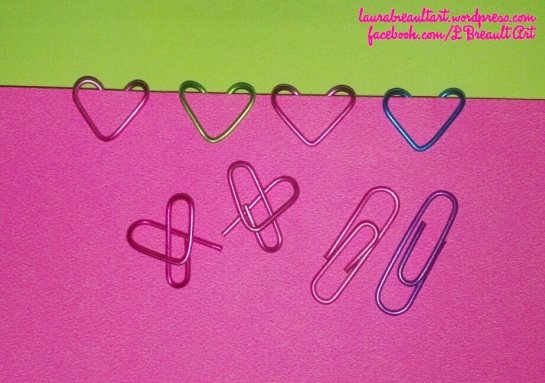
DIY Paper Clip Hearts: & since the last project wasn’t really a project, here is one I did while bored that I also came across on Pinterest. Paper Clip Hearts! Something to do when you’re bored, easy to make, also very personalized and girly. I love them! I made all my paperclips that I could find into hearts. ♥ ♥ ♥

So these are some of the things I’ve been spending my time doing while I wait for Natalia to arrive, which by the way, SHE IS STILL NOT HERE!!!!!! So that means I have to make another list of projects to do until she finally does decide to come. xoxo ♥

Signature_12252012

DIY Towel Travel Case

This is my super cute travel case to carry my tooth supplies. Props go to Pinterest. (:

IMG_20130306_011127
I used a small pink hand towel, folded it about a third of the way up, tag inside, then sewed 2 pieces of hot pink ribbon into the seem of the left side of the towel sewing all the way down to keep the section closed. Then I sewed the same pattern 3 more times creating 4 sections to hold all my teeth cleaning supplies. This project took a total of 60 minutes to make and it’s very useful. It can store all your toothbrushes and other tools you use, it keeps everything dry , it’s not nasty like those cheap plastic toothbrush covers that eventually mold your toothbrush and make it stink, and it’s washable! You can make them look so cute too! Just pick a pretty bright colored towel and a matching ribbon with cute designs and then you have everything you need to make your own personalized DIY Towel Travel Case!

Brazilian Dessert <3

2013-02-25_20-50-20_478

This is my mom’s famous Brazilian Brigadeiro’s Recipe. It has been a traditional dessert custom from my mom’s side of the family in Rio de Janeiro, Brazil. They are TOO DIE FOR. It only takes 4 simple ingredients and about an hour and a half to make. They are fattening but worth every calorie, I promise. (;

2013-02-25_18-27-05_899 2013-02-25_18-33-21_315 2013-02-25_18-47-23_630 2013-02-25_20-34-43_715Ingredients:

  • 2 cans sweetened condensed milk
  • 1 stick butter (1/2 stick per can)
  • 4 tbsp cocoa powder (or chocolate syrup)
  • Lots of sprinkles!
  • Candy/small cupcake wrappers

NOTE: This makes approximately 100 candies depending on the size you make them.

Directions:

  1. In a medium saucepan, combine butter, condensed milk and cocoa poweder or syrup. Cook over medium heat for about 20-25 minutes, turning the heat down to medium-low heat after about ten minutes or whenever the sauce starts to bubble vigorously.
  2. Stir consistently, the entire time, no breaks! To make sure you evenly cook the sauce mixture until it becomes a very thick paste. I suggest using a ceramic pot because then the mixture wont stick. But if you don’t have a ceramic pot, a regular one works just fine.
  3. After the sauce becomes a thick paste, remove from heat and let cool down for about 30-45 minutes. DO NOT cool in refrigerator. Let it cool down naturally.
  4. Now this step will take two people, one to make the balls and one to add the sprinkles. But this is totally capable of being a one man job. Just follow directions carefully! Separate all the candy wrappers and have them ready to insert the candies once they are sprinkled. You can set them on a large platter or plate, whatever you have that works.
  5. In a very large shallow bowl, pour all the sprinkles in it. Cover your hands with softened butter so you will be able to roll the mixture into balls. You can use and kind of greaser but butter works the best because its what you used to cook the candies with, so it wont change the flavor.
  6. After you butter your hands, use a small spoon to get a good amount of the dulce de leche mixture (that will fit in the candy wrapper) and roll it into a ball, then place it in the bowl of sprinkles. If you are doing this by yourself, do not start messing with the sprinkles until you have placed all of the candies in there, otherwise you will just make a big huge mess!
  7. Once you’ve finished rolling all the candies, cover them entirely with the sprinkles and place them in their designated wrapper. Then you’re done! I suggest putting them in the refrigerator for about 20-30 minutes to make them a little hard because they taste better in my opinion. Or if you just can’t wait then go ahead and eat them because they taste good regardless! (:

Meat, Cheese & Spinach Stuffed Pasta Shells

2013-02-14_20-13-52_613

The Finished Product. (:

These Delicious Homemade Meat, Cheese & Spinach Stuffed Shells was what I had for dinner a couple nights ago, and let me just inform you that they were so good, I literally could have had an orgasm in my mouth. A little too dramatic, lol but seriously, they were THAT good. I got the recipe from a fellow blogger although their recipe used very little amounts of ingredients. I used about twice as much as their recipe had and I added ground beef for the extra protein. My mom mentioned that I might be an even better cook than she is! That’s one of the greatest compliments ever because my mom is the best cook ever in my opinion. Ever since I was a little girl she always made homemade dinners from scratch Brazilian style that always tasted like heaven. So for her to tell me I could be a better cook than her is unbelievable. I posted the picture of my finished meal on Facebook and it got pinned on Pinterest! That just tells me how amazing my food looks (thanks to Instagram). I will leave reference for the bloggers recipe if you would like to make it yourself! (:

Related Articles: http://lisaglauner.wordpress.com/2013/01/09/recipe-marks-spinach-cheese-stuffed-shells/

2013-02-14_19-05-06_623

Ingredients minus the ground meat and shredded cheese.

2013-02-14_19-19-14_233

Sauteed Onion & Garlic for the meat.

2013-02-14_19-28-40_859

Cooked Meat. Note: I did not use all of this meat in my dish. just a little over a quarter of it.

2013-02-14_19-39-34_293

Ricotta, Egg, Spinach and Meat Mixture.

2013-02-14_19-40-05_235

Cooking the shells.

2013-02-14_19-39-46_85

Lined the baking pan with half the sauce jar.