Nursery Project Complete!

Natalia’s room is finally finished!!! I’m so proud of my hard work. I painted her entire room, night table and dresser, handmade her night table runner and most of her decorations. I also spent LOTS of money with all the “extras” to make this nursery absolutely perfect for my baby girl. Sadly, she will be 3 months in 3 days and is JUST now starting to spend time in her own room, lol!

IMG_20130605_173950_830 IMG_20130605_173547_091 IMG_20130605_173601_971 IMG_20130605_173621_056 IMG_20130605_173537_992 IMG_20130605_173529_326 IMG_20130605_173518_446 IMG_20130605_173643_138 IMG_20130605_173726_867 IMG_20130605_173737_695 IMG_20130605_173653_971 IMG_20130605_173813_196 IMG_20130605_173839_034 IMG_20130605_173932_159 IMG_20130605_173915_614 IMG_20130605_173923_238 IMG_20130605_173632_536 2013-03-16_12-37-05_220 IMG_20130605_173940_321 2013-03-16_12-37-21_806 2013-03-05_15-19-36_590 IMG_20130605_174002_387 IMG_20130605_174046_875 IMG_20130605_174033_203

DIY Cheeky Bikini Bottoms

IMG_20130527_225856_068     Okay my Florida people; it’s that time of the year! The sun is out, the weather is warming up, the beaches are getting packed, and social networks are being blown up with pictures of people under the sun in their bikinis! Although I love the cold weather because my hair stays perfect and my makeup actually stays on my face, however I also love lying under the sun, getting tan and cooling off in the salty ocean waves. While browsing Pinterest, as I so often do, I came across another DIY project that I just HAD to do. I know I’m not the only girl who hates those big, baggy, saggy granny panty bikini bottoms that create the ugliest tan lines of mankind, and if you try to buy “cheeky” bikini bottoms, or thongs even if you’re shameless, they’re pretty pricy ($30+). Not to mention the fact that I’m Brazilian and in Rio de Janeiro EVERYBODY walks around in thongs, speedos, even naked! I would never do any of that here in America, so I’ll do the next best thing: cheeky bikini bottoms! So here’s a simple solution: DIY Bikini Ruching. If I would’ve done it right the first time, the whole process would have only taken 15 minutes. But, that wasn’t the case for me. IMG_20130527_212224_529 IMG_20130527_213114_844 IMG_20130527_220454_755 IMG_20130527_223201_300 IMG_20130527_223311_346To start you will need a pair of bikini bottoms of your preference, a needle, thread the same color as the bottoms, a pen and scissors. The first time I attempted this, I only used one thread and it broke instantly. The second time, I used 2 threads and it lasted up until I tried them on and adjusted them, and then SNAP! That broke too…..so the third times a charm! I tediously fit THREE pieces of thread through that itty bitty needle hole (successfully) and start my sewing. Before I add any extra details, let me tell you the step by step process:

Just underneath the tag, make a tiny dot with your pen about ¼ of an inch away from the top seam. Continue drawing little dots straight down the middle a ¼ inch spaced between each dot. This is so you know where to put your needle. You can make the dots thinner or wider apart if you’d like depending on what you want it to look like. (The longer the distance, the bigger the ruch.)

Put your 3 threads (or 1 thick piece of thread if you have any [about 10” in length]) through the needle and tie a knot at the bottom.

Starting from the INSIDE of the bottoms, poke the needle through the top seam so the needle comes out on the outside. Then poke it back through down to the next dot. Do this consecutively until it’s at your desired ruch size. You can test this by pulling the threads to see how much up they will go, then pull the bottoms back to continue if needed. If it’s too much ruched, take out a dot or two. If it’s not enough, continue the process by poking through more dots.

When finished, cut the thread AT THE VERY END BY THE NEEDLE so you have plenty of string to use to tie the end knot. After you cut the thread by the needle grab three threads in each hand and tie 3 good, tight knots to secure the ruch. Cut the excess thread and viola, you have brand new cheeky bikini bottoms! FOR FREE (:

IMG_20130527_225734_466

Gradient/Ombré Nails Tutorial

IMG_20130517_194711Ever since last week when I learned how to do ombré nails, I became obsessed. The way the colors just blend together look totally awesome. It’s extremely different, exotic even. I love it! This week, I blended a series of warm colors: bright pink orange & yellow. I took pictures showing the steps I took to blend the colors.

First I painted my nails completely white so that the colors would show up real bright. Then I used a sticky note (you can use any piece of paper) to paint the colors on. Next, I used a makeup sponge to dab into the nail polish on the paper onto my white nails. I had to repeat this process several (about 4 or 5) times to fill it in completely and the blend properly. Lastly I painted a clear glittery coat on them to make them sparkle and to fill in the “spongy dots” on my nails, giving them a flat, shiny, glittery look. I also alternated the colors, doing the opposite for every other nail as you can see. It was fairly easy and a little time consuming, but very worth the outcome because they look AMAZING and ready for summer! (:

IMG_20130517_194926_934IMG_20130517_194945_888

Bold Nails!

Here is my latest nail art design. I’m very into the bright neon colors lately due to my love for bright colors and the fact that summer is right around the corner. I’m ready to make a bold statement with these nails. (:

IMG_20130414_191859We’ll start with my kitty cat toes. I used a florescent yellow and white as my base colors. Then used my dotting tool and a toothpick to draw the kitty cats and paw prints. Aren’t they just adorable?!

IMG_20130414_214448As for my nails, I felt that a bright turquoise was an appropriate color to match these toes. I also bought a teal dress last week that I plan to wear this weekend, so these nails will match it perfectly. I kept it plain and simple this time because I have an infant to take care of, which means I’m on call 24/7, which means I couldn’t spend hours doing anything fancy as I have done when I was pregnant. This took me about half an hour to do not including drying time. I use cooking spray to help dry the nails out, and I must say it works like a charm. I painted the accent nail white and did a half zebra half leopard print design on them. They have gotten a lot of compliments. ❤

Hubby’s Birthday Card & Beer Cake!

NOTE: His Birthday was on March 18th, same as Natalia’s due date, ironically! & I’m a little a lot late posting about it. But I had other things to blog about, so I’ve been doing them in their date order and spreading my blog posts to one a day so that I give my audience something to look forward to every day. Please bear with me. xo ♥

This year for my hubby’s birthday I decided I wanted to make something special for him instead of the traditional “buying him a present”, which I also did. As I was scanning through Pinterest – as usual – I came across some great gift ideas from gift baskets all the way to beer cakes. I decided to make a beer cake; & I don’t mean to toot my own horn (even though I love doing that sometimes) but the one I made is BA and it tops allllllll the ones I saw on Pinterest! I also handmade his birthday card and wrote a sweet note straight from my heart. ♥

IMG_20130319_124318
His Beautiful Handmade Card ♥
Some of the supplies I used to make the beer cake.
The cake stands that I painted metallic & sparkly green.

2013-03-16_13-30-34_344

Cutting one of my two spare cake rounds to form numbers of the year he's turning: "26".
Cutting one of my two spare cake rounds to form numbers of the year he’s turning: “26”.
My favorite part! Adding the glitter (:
The process of setting up the beer while putting some of his favorite little gifts inside.

There were little presents inside that he didn’t even know about, and I wasn’t going to tell him until he started drinking so he would find them himself. But since I’m pregnant, he’s going to wait for me! (:
And because he decided to wait, I could NOT wait any longer to tell him about the little gifts hidden inside, so he found them without drinking, lol! He absolutely LOVED his gift and his card I made him. He told me that this was the best birthday present he ever got and it melted my heart away. ♥ ♥ ♥

Adding the gold glittery ribbon.
Then the green ribbon on top.
A close up of the pipe cleaners that will be used to hold the scratch offs.
Adding the pretty happy Birthday bow. (:
Another layer of beer and more gifts.
Putting it on top.
Putting it on top.
One last layer of beer, no gifts for this layer though! It's coming out so nicely!
One last layer of beer, no gifts for this layer though! It’s coming out so nicely! At this point, the beer was getting so heavy I had to move it off my bed, hence the baking pan underneath.
I used a razor blade to cut off the side of an empty ribbon spool to use for the top part. Then a hole puncher for the holes that will be used to hold the numbers. The pipe cleaner is for the scratch off.
Almost finished! I had to put the 1,000,000 candy bar on there! It just matched so well and looked so good for my million dollar man! ;D
Close up of the smaller sized ribbon I added to the sides of the cake stands because they just looked so ugly.
More gold ribbons and bows!
Close up of the top.
The finished project! With the scratch offs attached. (:
BTW: he went STRAIGHT for the scratch offs and the candy bar before anything, ofcourse!
I love it, HE LOVED IT, & Pinterest will love it also ♥

Just for future reference to anybody who would like to make one of these bad boys, I used a 24 pack of yuengling beer cans, bought my ribbon and cake stands at Walmart, and the cute party bows at the Dollar Tree, as well as the candy. (:

15 More Nesting Projects To Do

Hello my beautiful readers! As I’ve mentioned in one of my previous posts, I just recently finished completing a list of 10-12 nesting projects that I was inspired to make from Pinterest, and I’m sure you guys are expecting my next list that I talked about making. Well, I’m done choosing which projects to do next while I wait for little Natalia to be here (which btw I’m 41 weeks and 1 day today and she’s still not here!) So to keep my head on straight, I’m going to occupy myself with these cute projects that I found to keep myself busy. (:

#1. Glitter Wine Glasses

155303887120076180_F3gIlXA5_c

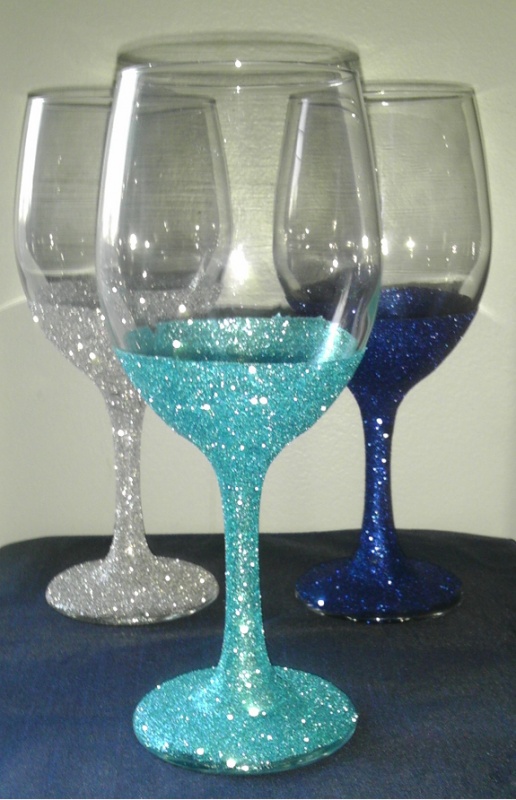
After I have this baby, I’m definitely planning on celebrating my treating myself to a very long missed glass of wine, but I want it to be festive and decorative so I’m going to make a pink glitter wine glass for my 9 month break celebration. These are so easy to make, all I need to do is get some very fine loose pink glitter and a couple of cheap wine glasses from the dollar store.

#2. DIY Nail Polish Rack.

ec802992a52689fed2123cf15860e096 dsc05671 07ab90ec8af04c8e1eb6c67f44c3827b

If you follow my blog, then you are familiar with my addiction for nail polish and nail art. I have quite a large collection of nail polish and nail art supplies, but they’re all stored away in shoe boxes. I was going to decorate the shoe boxes but it just seems like to much trouble, especially since they’re not even visible, they’re sitting on shelves in my closet. I planned to buy a nail polish display rack that mounts on the wall from Amazon, but it’s $30! I came across this AMAZING idea where you make your own nail polish rack using foam boards, glue and whatever you want to decorate it with. I find so many pros to this project that completely knock this item off my Amazon wish list. For one, it’s totally affordable. Considering I have all the decorations I need, I only have to spend $12 making this ($7 for 3 foam boards – 1.99 each plus tax @ Walmart, and $4 plus tax for some permanent craft glue.) Aside from the inexpensiveness of this project, one of my other favorite things about it is that you can make it as big or small as you want, add as many shelves as you want, and decorate it to match whatever you want! Instead of using duct tape like many other people used, I’m going to mod podge glitter on mine and use duct tape for the inside background to hide that screws that I will have to insert to mount it on the wall. I also plan to add a larger top shelf to hold all my nail art supplies; which brings me to the next project shown, the decorative tin cans that will hold all my brushes. When I’m done with this project it’s going to look so cute in my room and help me to keep all my nail polish stuff organized. Not to mention the easy access of it being conveniently hung on my wall so I don’t have to take down boxes from shelves!

#3. Modular Shelf Organization.

a1898bd862386d232fc2a3514638820d

This is another item that I have saved to my Amazon wish list. My obsession goes on to make-up which I have TONS of and am looking for new ways to organize it. I’m going to start by moving all my hair care products to modular shelves that I will hang next to my mirror on my dresser, moving them off my dresser so that I have more room to store the new makeup that I keep buying but don’t need.

#4. Glitter Keys

glueglitterclearnailpolish

I LOVE glitter (if you can’t tell) and am trying to use all of mine in the most useful ways. I want to make my ugly keys cute and girly and what better way to do that then to add glitter?! So I’m going to mod podge glitter to all my undecorated plain silver keys to make them look as cute as this one. I want to do them all in pink, but different shades to give them a gradient effect.

#5. DIY Sunglasses Holder

86c78c4179461466caf85a1fd1964386

I have soooooo many pairs of sunglasses put away in a bag that I have to go through every time I want to wear a different pair. It’s a little aggravating to have to dump the entire bag out just so I can see what the pairs look like. Not only that but they are also at risk of being damaged. So I came across this nifty idea that I want to make that also hangs on the wall. (I’m trying to decorate my plain walls!) All I need is a long skinny picture frame and some pretty ribbon (zebra of course!) to make this, so I plan on buying these items sometime this week when I get paid. (:

#6. Glitter Clothespin Magnets

2dfd40d86e0d698477ed4220f1f8cdfb gflitterclothespinmagnets

More glitter? Yes please! I found these ADORABLE clothespin magnets that you can decorate however you want. I like the way whoever did this decorated theirs. They used glitter and zebra print, which is what I plan to do, but I’m going to make mine turquoise, hot pink & lime green. I already have clothespins, magnets and zebra fabric and duct tape, whichever I decide to use. I just have to buy neon acrylic paint that I can get at Walmart for $1.50 a bottle and some new paintbrushes because I’ve been using the heck out of mine! So I’m due for a new set. (: These will go perfect on the DIY magnetic board that I also plan on making, but I will post about that later on.

#7. Shower Curtain Rod Organization

showerrodoppositeformorestorage

Since my shower caddy keeps falling off, and it’s hard to clean, and it’s pretty much breaking my shower head off, I found this useful idea to hang another shower curtain rod on the opposite side of the shower and use curtain hooks to hang dollar store baskets and other items. I’m definitely going to make use of this. I already have the shower curtain rod, but I can get the hooks for $1 at Dollar Tree and the cute baskets (orange to match my bathroom) at Familiar Dollar. I think I can get a pack of 6 for $3.

#8. Bobby Pin Carrier

F99B30F2AEAE2C52ACF5B5835FCC14_h400_w261_m2_bblack_q100_p100_cFuQsHCkx 820b81e68d55e11a14ab3960f6a2e88a

This simple idea is so useful for a girl like me. I use bobby pins ALL THE TIME and need them at the most random times. What better way to carry them than with a tic tac box?! I can use it for traveling and to just have in my purse. All I need to buy are the tic tacs. (:

#9: Easy To Make Bookmarks

d980cd466331df42af9766f7b87b7903 whenyouloseanearring

I’ve never been much of a reader, until lately. And I don’t have any cute bookmarks, but I do have a lot of cute missing or broken jewelry pieces, and tonsssss of scrap-booking paper and supplies as well as ribbon. So I figured I could put these items to use and make my own bookmarks like these cute ones!

#10. Easy To Make Hair Bows

7d2150a33d65c9466bee45d7b74c19b9

I loveee hair accessories: hair bows, headbands, ribbons, clips, flowers, anything to accentuate your everyday hairstyles. So I want to try to make my own just for the heck of it! I found this cute easy tutorial that I want to try out.

#11. Mod Podge Ceiling Fan

76a2987f58948d3712d43bf5b8b78f6a

I have an $80 zebra print fan blade set saved to my “future” Amazon wish list. But that just got deleted the other day when I came across this picture! Somebody used wallpaper border and applied it to their ceiling fan blades that made it look so good I had to do the same! But instead of using wallpaper border (because it’s pretty expensive) I’m going to use fabric mod podge and just apply zebra print fabric to it! I want to do this for my fan and the Natalia’s fan to match her and my zebra print bedrooms. ❤ *BTW the last of these projects including this one are all baby related projects.

#12. Glitter Rocks for Decoration

e8de5332f199f98d2a980b3e5c9b20b8

Yes, I have more glitter projects on the list. A girly girl like me can never have too much sparkle in her life. I think this is the cutest idea ever. Since I live in the country surrounded by woods and nature, these rocks are easy to find around here and match the environment so well, and adding sparkle will just give it that girly personalization that I love to add to everything of mine. But this project however is for my daughters bed room. I don’t have too many things decorating the tops of her dressers and night table, so this is an expensive decoration that I will make for her instead! I just need the rocks, the glue, the glitter and a cute little acrylic container to put them in, which I can get one at the Dollar Tree for just a dollar.

#13. Make a Plain Plastic Basket Cute with Ribbon

2809456d19e9f4640b691be445d1dfd8

Natalia has some baskets in her room that I bought to hold stuff in and they looks similar to this basket but they’re actually cuter because I bought pink ones, hehehe. (; I also have very pretty sparkly silver, black and white ribbon I can use to decorate them with even more because Lord knows how much I love ribbon and how many ribbon bows I already have all over Natalia’s room. She’s going to be such a girly girl just like her momma. ❤

#14. 3D Butterfly Frame

359c4f03ed6849681724982b9d30786c

I think this is just absolutely adorable. All white butterflies and one pink one with the baby’s name date and time of birth. I want to make this for Natalia and hang it on the wall. I need to buy a black frame and a butterfly punch. I have the card stock. This will be so fun to make!

#15. Decorated Letter

8ed9911b504435d938a008ce1360540b 6a9f4b3ba48c6e0b3ec924f26e130b91 6dbd1acd4bee1003bfb97fb8ef58ebdc fabriconcanvaswithwoodletters 505ac2cc508e92751255eac2847351fc 27b47d433e7ecb1b6a5229627b0f37d8

I was going to buy letters to spell out NATALIA, but they are so expensive these days! You can buy cheap ones, but they’re just not as cute as the other ones. I have old letters that spell out KAREN because that’s my sisters name, but she never used them, so they’ve just been laying around collecting dust. I’m going to use just the N letter and decorate that to hang on the door since her room already has too many wall decorations. I have all these photos for ideas and inspiration. ❤

Well these are my project plans for the next few weeks. I’m very excited about making them and I still have more that I want to do! But these will do for now. I will start shopping for my supplies tomorrow, so keep looking for my next post; it will be all these projects but MINE. (:

Signature_12252012

Nesting Pinterest Projects Complete!

Well I’m finally done with all my nesting projects! I can proudly say that I completed “almost” everything on my list, minus two. But I replaced them with even better projects that I came up with. Here are the results, hope you enjoy! (:

IMG_20130314_153238

Bread Bag Chip Clips for Cord Labels. I’ve collected about a handful of these and use neon labels cut to size to label them. I used labels instead of writing on them like the original idea because the sharpie wouldn’t stay on the plastic, it kept smearing off. Also some of the clips had expiration dates printed on them that I could not get off, so the labels covered them right up! Additionally, if I decide to get rid of whatever it is that’s labeled, I can remove the label and replace it with another one instead of throwing the entire thing away! #Recycle

IMG_20130306_011127

DIY Pinterest Inspired Towel Travel Case: This is soooooo much better than those nasty plastic toothbrush covers that don’t give your toothbrush enough air to dry completely and ends up molding and stinking up your toothbrush. Not to mention how dirty they get! This is way more practical for such hygiene products. It’s easy to clean, just throw it in the washer, it holds ALL your tooth cleaning supplies, and it’s too cute! You can decorate it however you want and make as many pockets as you want. You can add things to it like embroidery, extra ribbon, etc. I’m going to make more of these! (:

2013-03-04_23-58-55_816

My DIY Scarf Organizer: This was one of my favorites! It was so cheap and so cute when I was finished. I already had the hanger, just bought shower curtain rings at the dollar tree for $1, turquoise paint @ Walmart for 50 cents, and turquoise ribbon $1.97 each (I bought two spools, used 1 1/2). It looks so cute I don’t even want to hang it in my closet I want to hang it on the wall for display, but that’s tacky, so it’s in my closet, lol! ;D

2013-02-28_14-25-24_831

DIY Clipboard: How cute is this?! I bought the clipboard at the Dollar Tree ($1), Duct Tape @ Walmart ($3.50) and Ribbon also @ Walmart ($0.50 per yard – 1 yd.) It’s so girly and looks great hanging on my wall. Also very useful and the ribbon just adds the girly touch to it that I try to add to everything of mine. ♥

IMG_20130314_201155

DIY Outlet Covers: This project was replaced by these adorable outlet covers. It was supposed to be decorative storage tins but I didn’t have tins or chalk board paint; I do plan to get some in the future. I was going to spend $8.99 each on 2 outlet covers, but the problem was only one of my outlet covers had a place to insert a screw. The other one is screwless, and I couldn’t find zebra printed screwless outlet covers ANYWHERE online! So instead of spending the money and frustration on trying to find something that I had no luck with, I made my own! I didn’t even get the idea from anywhere, it just came to my mind because I’ve been crafting with my zebra duct tape A LOT. Actually, scratch that, the idea came from a picture my mom shared on my Facebook of a light switch plate covered in washi tape, which I thought was the cutest idea ever! So I remixed it to fit my needs. (:

IMG_20130323_110956

DIY Laundry/Dishwasher Magnet: This project was replaced by this cute little idea I got from Pinterest. It was supposed to be the other storage bins for my daughter’s headbands, but as I’ve mentioned I had no tins and no chalkboard paint. So this is what I made instead! We don’t have a dish washer, but if you do this is the perfect little magnet for it to answer that common question: “Are these dishes clean or dirty?!” I used to have one in my old house, so I know about the question, lol. I made this one to use for the laundry machine. Isn’t it adorable?!

IMG_20130303_174800

DIY Door Muff for Baby Nursery: This was an easy hand sewn project that took about an hour to make. I fell in love with the idea when I saw it on Pinterest and said to myself “I HAVE to make this for Natalia!” So I did, and I made it using colors and prints that would match her room. It’s purpose is to shut the door quietly without making any noises that will wake her. (:

2013-03-17_16-00-58_758 2013-03-17_16-05-55_441

DIY Bib Hanger: This was a clever idea I came across! Just buy adhesive hooks, stick them on the back of your high chair, and there you have it, easy to grab baby bib organization. It would be foolish of me NOT to do this…how convenient for me and what a space saver!

MaternityAshley

My professional photo shoot ribbon pic. I loved the ribbon idea because, well, I’m obsessed with ribbon. Photo credits to my good friend Ashley Rapasky. She does AMAZING photos so check out her fan page and click the like button! (:

IMG_20130314_143417

Healthy Carbonated Beverage: This was the last project on my nesting project list, although this isn’t really much of a project, more like a recipe. But nevertheless, it was on the list and it’s checked off as DELICIOUS! Everything you need to make it is shown here. Takes 5 minutes to make and it tastes so good! (:

IMG_20130322_233855

DIY Paper Clip Hearts: & since the last project wasn’t really a project, here is one I did while bored that I also came across on Pinterest. Paper Clip Hearts! Something to do when you’re bored, easy to make, also very personalized and girly. I love them! I made all my paperclips that I could find into hearts. ♥ ♥ ♥

So these are some of the things I’ve been spending my time doing while I wait for Natalia to arrive, which by the way, SHE IS STILL NOT HERE!!!!!! So that means I have to make another list of projects to do until she finally does decide to come. xoxo ♥

Signature_12252012

Pregnancy Post # 19 – 38 Weeks

37 Weeks & 6 Days Pregnant Photo

37 Weeks & 6 Days Pregnant Photo – Please excuse the dirty mirror.

*38 Weeks & 2 Days Today!
*147 Pounds :  37 Gained Since Pre-Pregnancy

I had my weekly Doctor’s Appointment today and was happy to find out that I am already 1cm. dilated! Which means I’m 1cm. closer to seeing my precious baby girl. This appointment was very short, I was in an out in about a half an hour and am scheduled to come in again next week for another pelvic exam to see Natalia’s progress.

Nervous WreckI also was scheduled for my biweekly Pregnancy Care Class appointment today, so I went there straight from my Doctor’s appointment. I learned a lot of need-to-know information about caring for your newborn. I relearned some things that I already knew, and learned new information that I’m thankful to know now! Also, a nursing student who is studying for her bachelors degree was there today and we spent about an hour and a half talking about baby care, birth and labor, and how to deal with your crying baby. She was 32 weeks pregnant with twin girls! So it was very interesting to have a talk with her. She also already had one daughter, so I asked her all about her labor experience, because now that I’m getting closer to the due date, I’m getting a little nervous about how I’m going to go through this. Her personal experience definitely helped ease my worries about giving birth, but even more so the after-birth. I am not looking forward to the breast pain that I’m going to experience when I get “engorged”, actually I might be even more nervous about that than the labor itself, lol!

2013-03-05_15-03-04_347

My Super Cute Diaper Bag! (:

So I asked her all about that and she gave me a few good tips on how to deal with it. I feel very good to be able to talk to other mothers who have gone through what I am about to go through. It helps me to feel more confident about giving birth and caring for my baby. Also, I don’t know if I have mentioned it before, but this care class that I attend gives you paper money for every appointment, which you can use to purchase things in their resource room. I’ve accumulated enough to buy an entire bassinet, which I’m going to get for my baby daddy since he doesn’t have anything for the baby to sleep in yet. I figured I could help him save that money and then he can spend it on me! ;D

2013-03-05_15-03-32_308Yesterday my adorable pink and zebra diaper bag, electrical breast pump and Natalia’s zebra print light switch plate finally came in the mail. I am totally in love with the diaper bag! It’s HUGE so it will carry everything I need, not to mention how stylish it is. It looks exactly like it did in the picture, so I am very satisfied with my (actually daddy’s) purchase. I am now waiting for the storage bins, the electrical outlet covers, the hair bows and hair bow organizer, the zebra print picture frames, the wall pops, hamper, and zebra baby shoes to come in and then that will be everything I need to complete the nursery. 2013-03-05_15-19-36_590I’m still trying to find things I can get to decorate the dresser, although I don’t want to clutter it because I have pink rhinestone scatters all over it. Besides, it’s not like her bedroom is going to have an audience anyways. Once the room is finally finished I’m going to make a tour video of it because the room is small and it’s kind of hard to take pictures of every little detail. So I’m just going to make a video showing everything off! By that time, Natalia will be born, so she’s going to be in her first video as well! (:

Baby daddy and I have been getting along very well since we spent the weekend together a couple weeks ago in Gainesville. In fact, when the baby is born he is going to take a whole week off of work to stay with me and the baby at my mom’s house. He wants to be around the baby for the first week of her being born so that she recognizes who her daddy is. He also wants to help me keep up with things around the house and make sure I get plenty of rest because he knows I will be feeling very tired post-pregnancy. 2013-03-05_15-03-42_591I am very appreciative of the way that he is behaving towards me and am surprised but happy about his attitude towards the baby and taking care of us once she gets here. We are going to continue living in separate households until he gets a house, which should be no later than the end of this year. He is being extremely sweet and helpful to me, getting me everything I need for the myself and the baby, offering to clean and cook for me in the first week of my being home after labor, and taking me out so that I’m not cooped up in the house all day. I really am enjoying the new and improved him and I’m happy to say that he has definitely exceeded my expectations.

IMG_20130304_010358This weekend we have plans to take professional maternity pictures. His uncle, who is a professional photographer, will be shooting a set of photos, and one of my good friends has asked me to be her maternity model for her portfolio. I proudly accepted her request and am going on a shopping spree this Friday with baby daddy to buy outfits for the shoot. So I have a busy weekend ahead of me that I am looking forward to!

After my eventful weekend, I am not planning to go out at all anymore unless absolutely necessary. I feel the need to be at home saving my energy for labor as I get closer to the due date.

EPIDURAL-PARTOAs far as my body and emotions, I am trying my best to remain calm as time passes by what seems like very quickly! I am extremely anxious and a little nervous about giving birth, especially because I have been feeling very strong Braxton hicks contractions. I can feel the baby moving inside of me near my upper thighs and it is so intense that it literally makes me want to just fall to the ground. I was fully aware that the contractions would get stronger and happen more frequently as I got bigger, but I had no idea that they would be SO uncomfortable! Sometimes, it paralyzes me and makes me not want to move at all for like 5 minutes straight. I’m getting more convinced that I might be getting an epidural, but I’m going to try my hardest to be a soldier and stick out the pain as long as I can. I will only settle for an epidural if the pain is ABSOLUTELY UNBEARABLE and has me in tears, because I saw a video demonstrating a doctor giving an epidural and I do NOT want that big ass hollow needle going into my back! Especially when there are rumors that half the time, the epidural only numbs you halfway. But we will see what happens, I am hoping for the best!

imagesI’m going to continue doing my prenatal yoga all the way up until the very end. I read that this also helps induce labor. I am also going to try to refrain from thinking about any negative thoughts about giving birth because I want this to be a happy experience for me, even though I know it will be painful, but only for the periods of contracting and pushing. Once I see my beautiful baby girls face, I will forget all about the pain, and I am looking forward to that moment. ❤

38 Weeks & 2 Days Pregnant Photo

38 Weeks & 2 Days Pregnant Photo

Baby Project #3: Natalia’s Keepsake Box

This is my newest baby project: Natalia’s baby box. I decided to make her a box that would contain all her keepsakes as memoirs. I wanted to decorate it to match her nursery which is all zebra print with light pink and dark pink polka dots. This is the completion of it & I think it turned out 10x times better than I imagined in my head! Even though I sketched it before hand. ;D

This is the second box that I’ve decorated and I did a wayyyyy better and faster job on this one than my first. It only took me 3 days to complete, but only because I had to wait to go to the store to get the rest of the supplies I needed. When I made my first box, I googled “how to decorate a box” and was disappointed not to see too many instructions on how to do that. So I am going to make my own instructions on box decorating!

  1. Brainstorm! The first step is to think about what you want to have a box for of course. It could be to store things in, to give as a gift, or simply just for a decoration project when you’re bored!
  2. Decide what size box you need/want, and go get it! I knew I needed a big box because I was going to store an entire baby book along with other bulky items such as her homecoming outfit and things of the like. I got my box for free at a shoe store because buying a big box would just be too expensive, and they are usually already decorated. What’s the fun in that?!2013-02-28_11-50-52_524
  3. Sketch a drawing of what you imagine your box to look like. I always think before hand to save time. I sketched how I wanted the box to look like, what kind of fabric I would use, the colors, the accessories, and the font for the lettering.2013-02-25_18-53-24_43
  4. Shop for supplies! This is my favorite part (;
    Buy everything you will need to make your box. I went to Walmart and bought zebra and polka dot fabric ($8), 3 packs of assorted pink buttons ($6; $2 ea.), a pretty pink bow clip in the children’s section ($1), and then went to Save A Lot for fabric glue ($2) because it’s just cheaper there. The other supplies, I already had, which include a sharpie, a pink marker, and card stock to draw the name, loose black glitter, Elmer’s glue, fabric scissors, and zebra duct tape ($3.50).

    2013-02-28_11-52-31_53

    I don’t have all the supplies I used in this picture & I did not end up using that pink ribbon, but instead a cheap $1 hair bow. (:

  5. Measure and cut fabric to size of the box. I bought such a large piece of zebra fabric that I didn’t have to do too much cutting and it turned out looking so much better than if I would have had to cut it to fit around the corners because it wrapped around perfectly (conveniently for me). I started by gluing one side at a time and letting it dry before I went on to gluing the next side, this way when I pulled the fabric around the corner, I wouldn’t move the fabric I just glued out of place. Make sure you glue the very outside edges of the inside and the outside of the sides of the box. Otherwise, if you just glue the insides, you will have to come back around and glue the outside, but it will be hard to lift the fabric because it will already be glued around the box.2013-03-03_22-41-56_973
  6. To give the bottom of your box a neat finish, fold the fabric as if you were wrapping a preset box and glue the trim down and hold it in place until it’s somewhat dry (It will completely dry on its own, but this makes the fabric completely flat because the glue will seep through the fabric).2013-03-03_22-10-35_291
  7. You can use the same technique to fabric the lid, but the lid is easier because you can glue the edges of the top, place the fabric, let it dry, and then one by one glue each side down, folding the corners inwards to make it look neat.2013-03-03_22-41-29_272
  8. Cover the bottom of the inside of your lid and box. I used the pink polka dot fabric to cover the inside of the lid, and zebra duct tape to cover the inside of the box. I used tape because it was easier to make stick, it would hold the bottom fabric in place and it looks good! I used the pink on the lid because I wanted it to be different. 😀2013-03-03_23-52-34_582013-03-03_23-52-11_657
  9. Lastly, decorate it however you like! I cut a smaller sized square piece of the pink polka dot fabric and glued (just the edges) in the middle top of the box lid. I then drew Natalia’s name in cooky, child like font letters. I used the elmer’s glue to glue a trim on the outside of the card stock and sprinkled glitter all over it to give it a cute border. Then I glued the pink buttons on the border of the pink fabric, after I arranged them to make sure they would all fit. I glued the pink box in the corner and then her name in the middle. Finally finished! Although I still want to get some black sequin ribbon to glue on the inside of the lid to border the pink fabric under there, but for now it looks good, and the ribbon can wait until next time I go to the store.2013-03-03_23-49-39_132 2013-03-03_23-51-00_12

    2013-03-03_23-52-56_433

    The Finished Project! ♥

Valentine’s Day Nails <3

IMG_20130204_235442These are my Valentine’s Day Nail Designs Set #1. I numbered it because I plan on doing at least 3 other Valentine’s Day inspired designs I found on the internet that I just HAVE to try! I really like this design because I think stripes look so cute on nails (it makes them look like present boxes) and it uses the perfect colors for this Holiday: white, light pink, dark pink, and red. It even has a little sparkle on the lips. ;*

2013-02-04_21-14-47_475You can either paint all your nails the same base color (preferably a light color), or you can do what I did and alternate the colors on each of your toes. I did light pink, dark pink, and white on my right foot and then dark pink, white and light pink on my left foot. Then, I used several different sized brushes to draw thin and thick lines in different colors on all of my toes. I thought about just putting stripes on my big toes, leaving my little toes the alternated colors and just adding a rhinestone to the bottom of each toe. Another great thing about this nail design is that you can switch up the patterns, which toes get decorated, and even change out the colors so you can match any holiday!

2013-02-04_17-10-23_493For this design, I used my ruby Kisses French White, Wet n’ Wild Shin’s Tickled Pink, Pure Ice Flirt Alert, Nicolé by OPI’s Stolen Kisses and Sally Hansen’s Diamond Strength Wedding Crasher. Oh, I can’t forget the top coat: my most frequently used Sally Hansen’s Clear Base & Top coat. I also used several different sized brushes of different brands (all ordered online @ Amazon from Hong Kong) and a small sized dotting tool to draw my kisses. It doesn’t take any special nail decorations, just polish, one brush will do, and a dotting tool. If you don’t have these items, then improvise! You can buy nail art polish at the Dollar Tree for one dollar and use that brush (although you have to clean it every time you use a different color) and instead of paying $8 at Sally’s Beauty Supply on a dotting tool, you can use a toothpick; it works just the same. I buy all my nail art tools online simply because it’s cheaper and you get more for your money. But you can use simple everyday items around the house to save yourself the money. This design took me about an hour to do, not including drying time. So if you have the time and if you’re up to it, try it out! You’ll have the cutest toes ever and you don’t even have to go to the salon. (:

2013-02-05_11-20-57_468

2013-02-05_11-21-53_209As for my nails, I decided to use a different style, the one I thought about for my toes as I mentioned previously. I wanted something that would match my toes because I usually get so excited about nail art that I can’t make a decision on which one to do, so I do one for my nails and a different one for my toes. But this timeee, I’m going to match them. (:

2013-02-04_23-44-36_591First, I painted my nails the alternated colors: light pink, white, dark pink, white, light pink. I apply two coats of each of these colors; after they dry, I used my Milani Silver Dazzle, a sparkly charcoal color, to draw X’s and O’s on my ring fingers in a diagonal pattern. I then used  OPI’s Stolen Kisses to draw 3 kisses on my index fingers. While my kisses dry, I use Pure Ice Beeware, a silver glitter polish to paint glitter tips and then I brought them down to about halfway of my nail as light towards the middle as possible to give it a gradient effect. By this time, my kisses have dried, so now I apply Sally Hansen’s Diamond Strength Wedding Crasher glitter polish on the lips to make them stand out. I apply three rhinestones on each of my hands in the middle at the very bottom of my thumbs, pinky’s and middle fingers. Last I apply a top coat and let them dry and BAM: my matching Valentine’s Day nails are done. This design was actually really easy and I didn’t even have to look online for an idea, it just kind of came to me after I got done painting my toes. (I’ll probably do that from now on so my idea’s will be more original.) This design took about 35 minutes not including drying time.